
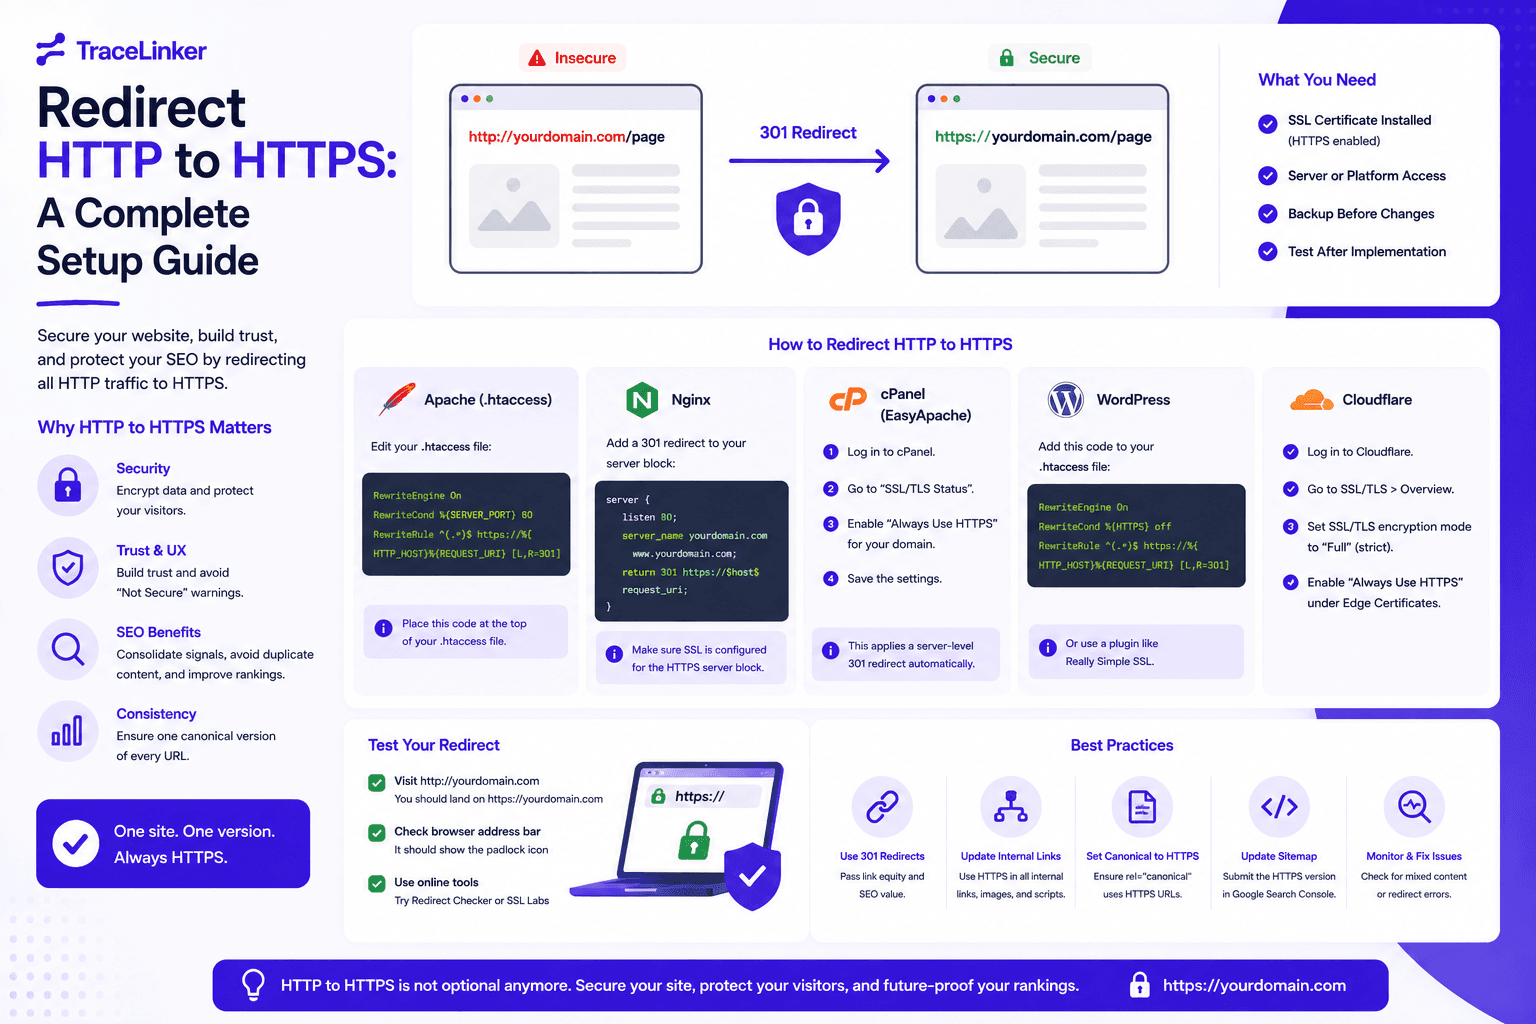


Redirect HTTP to HTTPS: A Complete Setup Guide
Every website that cares about security, trust, and search performance should use HTTPS. But simply installing an SSL certificate is not enough. You also need to redirect every HTTP request to the HTTPS version of the URL. Otherwise, visitors and search engines can still access the insecure version, which creates duplicate content and security warnings.
This guide explains how to set up an HTTP to HTTPS redirect on the most common servers and platforms. It is written for website owners, developers, and SEOs who need a reliable, server-level redirect that preserves rankings and avoids redirect loops.
Why HTTP to HTTPS matters
HTTPS encrypts the data sent between a visitor and your server. It protects passwords, payment information, and any other data exchanged on the site. Beyond security, HTTPS is also a confirmed Google ranking signal, and modern browsers mark HTTP pages as "Not secure."
If both HTTP and HTTPS versions of your site are accessible, search engines may treat them as duplicate content. A proper redirect tells Google and other crawlers that the HTTPS version is the canonical one. It also ensures every visitor lands on the secure version, even if they click an old HTTP link.
How the redirect works
When a browser or crawler requests an HTTP URL, the server responds with a 301 redirect status code and a Location header pointing to the HTTPS version. The browser then requests the HTTPS URL.
A 301 redirect passes most of the SEO value from the old URL to the new one. That is why it is the correct choice for this type of permanent change. Other status codes like 302 or 307 are temporary and should not be used for a permanent protocol migration.
Prerequisites
Before you set up the redirect, make sure:
- An SSL/TLS certificate is installed. The HTTPS version of your site must load without certificate warnings.
- All internal resources work over HTTPS. Check that images, scripts, stylesheets, and fonts do not load over HTTP, which causes mixed content warnings.
- You have access to your server configuration. You need to edit
.htaccess, Nginx config, IISweb.config, or your CDN rules. - You have a backup. Redirect rules can cause loops or break access. Save your current config before making changes.
Method 1: Apache
Apache supports redirects in the server configuration file or in a directory-level .htaccess file. If you are on shared hosting, .htaccess is usually your only option.
Using .htaccess
Add this at the top of your .htaccess file:
RewriteEngine On
RewriteCond %{HTTPS} off
RewriteRule ^(.*)$ https://%{HTTP_HOST}/$1 [R=301,L]
This checks if HTTPS is off and redirects the entire request to the HTTPS version while preserving the path.
Using a virtual host
If you manage the server, you can handle the redirect in the Apache virtual host for port 80:
<VirtualHost *:80>
  ServerName example.com
  Redirect permanent / https://example.com/
</VirtualHost>
This approach is cleaner and usually faster than .htaccess because it avoids the overhead of mod_rewrite.
Method 2: Nginx
In Nginx, the redirect is set in a server block that listens on port 80:
server {
  listen 80;
  server_name example.com;
  return 301 https://example.com$request_uri;
}
The $request_uri variable preserves the full path and query string. If you want to redirect both www and non-www versions, add the appropriate server_name entries or use a separate server block for each.
After editing the config, test it and reload Nginx:
sudo nginx -t
sudo systemctl reload nginx
Method 3: IIS on Windows
IIS uses the URL Rewrite module for redirects. If it is not installed, download it from the Microsoft website first.
- Open IIS Manager and select your site.
- Double-click URL Rewrite.
- Click Add Rule(s) and choose Blank rule under Inbound rules.
- Set the rule name to something like "HTTPS Redirect."
- Under Match URL, set:
- Requested URL: Matches the Pattern
- Using: Regular Expressions
- Pattern:
(.*)
- Under Conditions, add a condition:
- Input:
{HTTPS} - Check if input string: Matches the Pattern
- Pattern:
^OFF$
- Input:
- Under Action, set:
- Action type: Redirect
- Redirect URL:
https://{HTTP_HOST}{REQUEST_URI} - Redirect type: Permanent (301)
- Click Apply.
The module will write the following into your web.config:
<rule name="HTTPS Redirect" stopProcessing="true">
  <match url="(.*)" />
  <conditions>
    <add input="{HTTPS}" pattern="^OFF$" />
  </conditions>
  <action type="Redirect" url="https://{HTTP_HOST}{REQUEST_URI}" appendQueryString="false" />
</rule>
Method 4: Cloudflare
If you use Cloudflare, you can enforce HTTPS without touching your server config.
- Go to SSL/TLS > Edge Certificates.
- Turn on Always Use HTTPS.
- Create a Page Rule:
- URL pattern:
http://*example.com/* - Setting: Always Use HTTPS
- URL pattern:
Cloudflare will then handle the redirect at the edge, which is fast and easy to maintain. Just make sure your SSL/TLS mode is set to Full or Full (Strict) so the connection between Cloudflare and your origin server is also encrypted.
Method 5: WordPress
If your site runs on WordPress and you do not want to edit server config, you have two main options.
Plugin approach
Plugins like Really Simple SSL detect your SSL certificate and handle the redirect, mixed content, and security headers for you. This is the easiest option for non-technical users.
Manual approach
You can also edit the wp-config.php file to force HTTPS for the admin area:
define('FORCE_SSL_ADMIN', true);
Then add a server-level redirect using one of the methods above. Server-level redirects are preferred because they run before WordPress loads, which is faster.
HTML and JavaScript fallbacks
HTTP redirects can also be done with HTML meta tags or JavaScript, but these should only be used when you have no control over the server:
<meta http-equiv="Refresh" content="0; URL=https://example.com/">
window.location = "https://example.com/";
These methods are slower, less reliable, and do not pass SEO authority the way a 301 does. Use a server-level redirect whenever possible.
Verify the redirect
After setting up the redirect, test it before moving on.
- Browser test: open
http://example.comand confirm it redirects tohttps://example.comwith a lock icon. - curl test: run this from a terminal:
curl -I http://example.com
You should see a 301 Moved Permanently response and a Location: header pointing to the HTTPS URL.
Deep link test: test a few internal URLs, not just the homepage. The redirect should preserve the path and query string.
Google Search Console: submit your HTTPS property if you have not already, and confirm that Google can crawl the HTTPS version.
Update your site after the redirect
A redirect alone does not fix every SEO issue. You should also:
- Update internal links. Change any hardcoded
http://links in your content, templates, and navigation tohttps://. - Update canonical tags. Make sure your canonical URLs point to the HTTPS version.
- Update XML sitemaps. Regenerate your sitemap with HTTPS URLs and resubmit it to search engines.
- Update external tools. Make sure Google Analytics, Google Tag Manager, and ad platforms use the HTTPS URL.
- Check backlinks. If important external sites still link to the HTTP version, the redirect will pass most authority, but you can reach out and ask them to update the link.
For a broader technical audit, use our web audit checklist to make sure nothing else is missed.
Fix mixed content issues
After switching to HTTPS, some pages may still load resources over HTTP. This causes mixed content warnings and may prevent the lock icon from appearing. Common culprits include:
- Images with
http://URLs - External scripts or stylesheets
- Embedded videos or iframes
- Inline references in CSS or JavaScript
To fix mixed content, update the URLs to HTTPS or use protocol-relative URLs where appropriate. Browser developer tools usually show which resources are being blocked.
Add HSTS for extra security
HSTS, or HTTP Strict Transport Security, tells browsers to always request the HTTPS version of your site for a specified period. It prevents downgrade attacks and eliminates the small window where a user might visit the HTTP version.
Add this header once your HTTPS redirect is working correctly:
Header always set Strict-Transport-Security "max-age=31536000; includeSubDomains; preload"
add_header Strict-Transport-Security "max-age=31536000; includeSubDomains; preload" always;
Start with a short max-age value to test, then increase it once you are confident there are no issues.
Avoid redirect loops and chains
A redirect loop happens when a URL redirects to itself or when two URLs redirect to each other. Browsers will show an error, and crawlers will stop following the chain.
Common causes:
- A redirect rule that does not check the protocol correctly.
- A load balancer or CDN that terminates SSL and forwards HTTP to the origin, which then redirects back to HTTPS.
- Conflicting rules in
.htaccess, Nginx config, and Cloudflare.
To debug, disable rules one at a time, clear your cache, and use curl -I or browser developer tools to inspect the response chain.
HTTP to HTTPS redirect checklist
Use this checklist when migrating a site to HTTPS:
- SSL certificate installed and HTTPS works without warnings
- Server-level 301 redirect from HTTP to HTTPS configured
- All internal links updated to HTTPS
- Canonical tags point to HTTPS
- XML sitemap regenerated with HTTPS URLs
- Google Search Console HTTPS property added
- Mixed content warnings resolved
- HSTS header added after testing
- Redirect loop tested across homepage and internal pages
- Backup of old server configuration saved
Final thoughts
Redirecting HTTP to HTTPS is a basic but critical part of running a modern website. A server-level 301 redirect is the cleanest, fastest, and most SEO-friendly way to do it. It protects your visitors, consolidates your URLs, and signals to search engines that HTTPS is the canonical version of your site.
Choose the method that matches your hosting environment: Apache, Nginx, IIS, Cloudflare, or WordPress. Then verify the redirect, update your internal links and sitemaps, fix mixed content, and consider adding HSTS. If you are running a technical SEO audit, this step should be near the top of your list.
For more technical SEO guidance, check our web audit checklist. And if you are tracking backlinks to your site, use TraceLinker's free backlink checker to make sure external links still pass value after your protocol change.